Deploy a Sample Container Apps Application
In this post, we’ll show you a process for automating the deployment of a Container Apps workload along with the Azure resources required for its environment.
We’ll be using the Azure CLI in a bash shell. If you’re on Windows, you can follow along with the Windows Subsystem for Linux.
You’ll need the following tools installed into your shell.
- Azure CLI
- Docker
The source code is available here:
https://github.com/playtimesolutions/ContainerAppsDemo
Step 1 – Setup the local environment and variables
1.1. Set the working account
Set your working account with your subscription id.
					SUBSCRIPTION_ID="<your_subscription_id>"
az login
az account set --subscription $SUBSCRIPTION_ID
Note: Your user account will need to have the Contributor role assignment for the subscription.
1.2. Setup common variables
The following variables are required to parameterise the deployment.
					ENVIRONMENT_NAME="container-apps-demo"
LOCATION="australiaeast"
RESOURCE_GROUP="container-apps-demo-rg"
KEYVAULT_NAME="${ENVIRONMENT_NAME}-kv"
DEPLOYMENT_NAME="${ENVIRONMENT_NAME}-deployment"
1.3. Define a unique container registry name
The container registry name is globally unique so we need to set up a pseudo-random name – the following bash generates a URL based on the subscription and resource group name.
					UNIQUENESS=$(echo -n "${SUBSCRIPTION_ID}-${RESOURCE_GROUP}" | sha256sum | head -c 6)
CONTAINER_REGISTRY_NAME="${ENVIRONMENT_NAME//-/}${UNIQUENESS}"
CONTAINER_REGISTRY_URL="${CONTAINER_REGISTRY_NAME}.azurecr.io"
1.4. Verify the variables before deployment
Echo the variables so you can see how each resource will be named in your deployment.
					echo "Environment Name:   $ENVIRONMENT_NAME"
echo "Location:           $LOCATION"
echo "Resource Group:     $RESOURCE_GROUP"
echo "Keyvault Name:      $KEYVAULT_NAME"
echo "Deployment Name     $DEPLOYMENT_NAME"
echo "Container Registry: $CONTAINER_REGISTRY_URL"
Step 2 – Deploy the environment
2.1. Create the resource group
The following resource will contain all the resources we’ll create in this demo. You can remove everything created when you’re done by simply deleting the resource group.
					az group create \
    --location $LOCATION \
    --name $RESOURCE_GROUP
2.2. Use the Azure CLI to create a deployment
This step will apply a set of bicep templates to create the environment. Use the Azure CLI to create a deployment.
					az deployment group create \
	--resource-group $RESOURCE_GROUP \
	--name $DEPLOYMENT_NAME \
	--template-file environment.bicep \
	--parameters "containerRegistryName=$CONTAINER_REGISTRY_NAME" \
	--parameters "environmentName=$ENVIRONMENT_NAME" \
	--parameters "keyVaultName=$KEYVAULT_NAME"
This will take a few minutes. Once completed, your environment is ready to deploy your first container app. Before we proceed, let’s examine the bicep in detail.
environment.bicep
The following bicep template is the entry point to deploy each Azure resource in the environment.
You’ll notice each param maps to the parameters provided on the CLI in step 2.2.
					// Input parameters from the CLI
param containerRegistryName string
param environmentName string
param keyVaultName string
param location string = resourceGroup().location

// Keyvault
module keyVault './modules/keyvault.bicep' = {
  name: '${environmentName}-kv-deployment'
  params: {
    keyVaultName: keyVaultName
    location: location
  }
}

// Container Registry
module containerRegistry './modules/container-registry.bicep' = {
  name: '${environmentName}-acr-deployment'
  dependsOn: [keyVault]
  params: {
    containerRegistryName: containerRegistryName
    keyVaultName: keyVaultName
    location: location
  }
}

// Container App Environment
module containerAppEnvironment './modules/container-app-environment.bicep' = {
  name: '${environmentName}-env-deployment'
  dependsOn: [containerRegistry]
  params: {
    environmentName: environmentName
    keyVaultName: keyVaultName
    location: location
  }
}
For this simple environment, we only have a few resources.
Key Vault
We need somewhere secure to store the container registry access keys. In future, we can use the vault to store many other secrets, including connection strings, API keys, certificates, encryption keys, etc.
modules/keyvault.bicep
This template deploys the key vault.
Note:
- As we intend to access the vault via bicep later, we need to set the property enabledForTemplateDeployment to give the Azure Resource Manager permission to interact with the vault.
- Right now we don’t have any access policies. In the future, we will want to lock down access to only the service principles requiring access in order to implement zero-trust.
					param keyVaultName string
param location string = resourceGroup().location

resource keyVault 'Microsoft.KeyVault/vaults@2021-11-01-preview' = {
  name: keyVaultName
  location: location
  properties: {
    sku: {
      family: 'A'
      name: 'standard'
    }
    accessPolicies: []
    enabledForTemplateDeployment: true
    tenantId: subscription().tenantId
  }
}
Container Registry
The container registry will store the container images used at runtime by each application in the environment. We can use any registry, but since we’re using Azure it makes sense to use an Azure Container Registry resource.
modules/container-registry.bicep
This template deploys the container registry.
Note:
- This is not a highly secure scenario so we will enable public access and pull our containers with an access key. We can improve upon this with VNET Private Endpoints and Azure RBAC in a future article.
- Once the container registry has been created, we inject the access key into a secret so we can reference it later.
					param containerRegistryName string
param keyVaultName string
param location string = resourceGroup().location

resource containerRegistry 'Microsoft.ContainerRegistry/registries@2022-02-01-preview' = {
  name: containerRegistryName
  location: location
  sku: {
    name: 'Standard'
  }
  properties: {
    adminUserEnabled: true
    publicNetworkAccess: 'Enabled'
  }
}

resource keyVault 'Microsoft.KeyVault/vaults@2021-11-01-preview' existing = {
  name: keyVaultName
}

resource acrAccessKey 'Microsoft.KeyVault/vaults/secrets@2021-11-01-preview' = {
  name: 'acr-accesskey'
  parent: keyVault
  properties: {
    attributes: {
      enabled: true
    }
    value: containerRegistry.listCredentials().passwords[0].value
  }
}
Container App Environment
This is the resource in which our container apps will reside. It is analogous to a Kubernetes cluster and is fully managed by Microsoft, providing a limited subset of what Kubernetes offers.
modules/container-registry.bicep
This template deploys the Container App Environment and the associated Log Analytics Workspace.
					param environmentName string
param keyVaultName string
param location string = resourceGroup().location

resource containerAppEnvironment 'Microsoft.App/managedEnvironments@2022-03-01' = {
  name: '${environmentName}-env'
  location: location
  properties:{
    appLogsConfiguration: {
      destination: 'log-analytics'
      logAnalyticsConfiguration: {
        customerId: reference(logAnalyticsWorkspace.id, '2021-06-01').customerId
        sharedKey: listKeys(logAnalyticsWorkspace.id, '2021-06-01').primarySharedKey
      }
    }
  }
}

resource logAnalyticsWorkspace'Microsoft.OperationalInsights/workspaces@2021-06-01' = {
  name: '${environmentName}-law'
  location: location
  properties: {
    retentionInDays: 30
    sku: {
      name: 'PerGB2018'
    }
  }
}
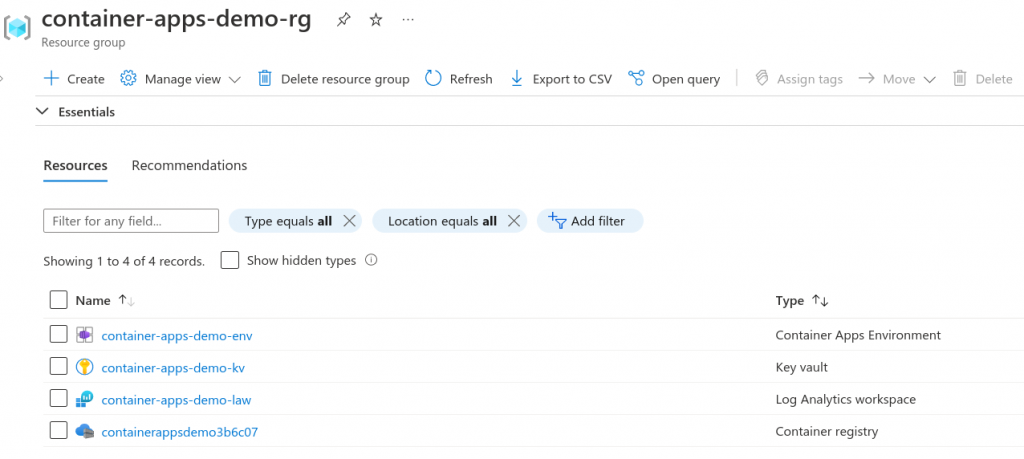
The environment is now ready to accept a container app. Let’s look at what we have so far in the Azure portal.
Step 3 – Build and deploy the sample application
To keep things simple we will deploy the Microsoft ASP.NET sample container image.
3.1. Tag the image
We’ll use the current date and time to make our image name unique. Typically a build pipeline job would use the build number or some other identifier for traceability and uniqueness of container images in the registry.
					TAG=$(date '+%Y%m%d%H%M%S')
IMAGE_NAME="sample-app:$TAG"
CONTAINER_IMAGE="$CONTAINER_REGISTRY_URL/$IMAGE_NAME"
3.2. Pull the image and re-tag it
					docker pull mcr.microsoft.com/dotnet/samples:aspnetapp
docker tag mcr.microsoft.com/dotnet/samples:aspnetapp $CONTAINER_IMAGE
3.3. Login to the container registry
Note: We can use our user’s principal to login to the container registry – this allows us to interact with the registry without exposing the access keys.
az acr login --name $CONTAINER_REGISTRY_NAME
3.4. Push the image
docker push $CONTAINER_IMAGE
3.5. Deploy the container app
					az deployment group create \
	--resource-group $RESOURCE_GROUP \
	--name $DEPLOYMENT_NAME \
	--template-file src/sample-app/deploy.bicep \
	--parameters "containerRegistryName=$CONTAINER_REGISTRY_NAME" \
	--parameters "environmentName=$ENVIRONMENT_NAME" \
	--parameters "imageName=$IMAGE_NAME" \
	--query properties.outputs.fullyQualifiedDomainName.value
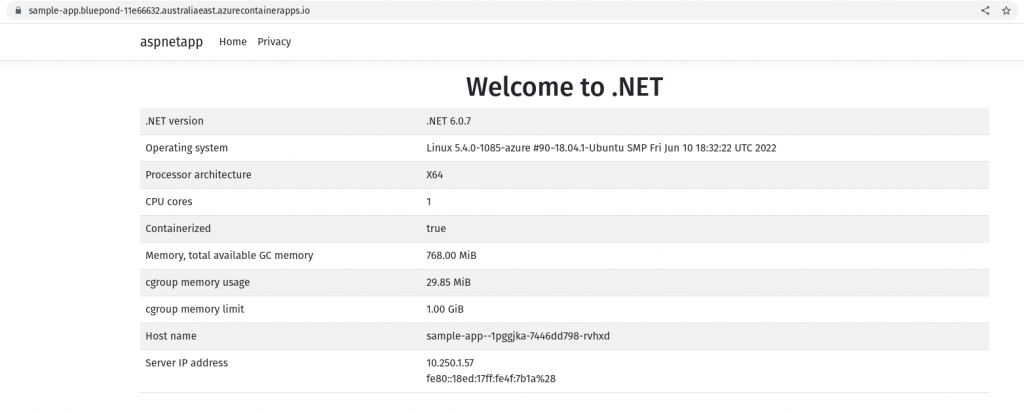
Once the command completes, the sample app will be running in a container app.
Let’s dive into the bicep.
./src/sample-app/deploy.bicep
The following bicep template is the entry point to deploy the container app.
Note:
- Our key vault is used to pass a secure secret into the container app module – this is the container registry access key secret we created during the container registry resource creation.
- An output string provides the fully qualified domain name back to the CLI so we can conveniently navigate to the application without having to go to the portal to get the url.
					param containerRegistryName string
param environmentName string
param imageName string
param location string = resourceGroup().location

resource keyVault 'Microsoft.KeyVault/vaults@2019-09-01' existing = {
  name: '${environmentName}-kv'
}

module sampleApp './../../modules/container-app.bicep' = {
  name: '${environmentName}-sample-app-container-app-deployment'
  params: {
    acrAccessKey: keyVault.getSecret('acr-accesskey')
    acrUsername: containerRegistryName
    containerAppName: 'sample-app'
    containerRegistry: '${containerRegistryName}.azurecr.io'
    environmentName: '${environmentName}-env'
    imageName: imageName
    location: location
  }
}

output fullyQualifiedDomainName string = sampleApp.outputs.fullyQualifiedDomainName
modules/container-app.bicep
This module has the definition for a container app workload.
We can re-use this module across many workloads. However, in practice, you might want to consider a single-purpose template for each workload to provide an additional level of customisation, as the specific details of each template could differ, e.g. scaling rules, sidecar containers, etc.
Note:
- The access key is securely injected into the container app and used by the runtime to pull the container image upon deployment.
- We’re exposing the application on a public ingress endpoint, meaning in this example we won’t need an application gateway or public load balancer to provide a public endpoint.
- We have a basic scaling rule which will add additional instances based on the number of concurrent HTTP requests.
					@secure()
param acrAccessKey string

param acrUsername string
param containerAppName string
param containerRegistry string
param cpu string = '0.5'
param environmentName string
param imageName string
param location string
param memory string = '1.0Gi'
param maxReplicas int = 10
param minReplicas int = 0
param targetPort int = 80


resource containerAppEnvironment 'Microsoft.App/managedEnvironments@2022-03-01' existing = {
  name: environmentName
}

resource containerApp 'Microsoft.App/containerApps@2022-03-01' = {
  name: containerAppName
  location: location
  properties: {
    managedEnvironmentId: containerAppEnvironment.id
    configuration: {
      secrets: [
        {
          name: 'acr-accesskey'
          value: acrAccessKey
        }
      ]
      registries: [
        {
          server: containerRegistry
          username: acrUsername
          passwordSecretRef: 'acr-accesskey'
        }
      ]
      ingress: {
        external: true
        targetPort: targetPort
        transport: 'auto'
      }
    }
    template: {
      containers: [
        {
          image: '${containerRegistry}/${imageName}'
          name: containerAppName
          env: [          ]
          resources: {
            cpu: json(cpu)
            memory: memory
          }
        }
      ]
      scale: {
        minReplicas: minReplicas
        maxReplicas: maxReplicas
        rules: [
          {
            name: 'http-rule'
            custom: {
              type: 'http'
              metadata: {
                concurrentRequests: '3'
              }
            }
          }
        ]
      }
    }
  }
}

output fullyQualifiedDomainName string = '${containerAppName}.${containerAppEnvironment.properties.defaultDomain}'
The application is now ready to handle requests.
Cleanup
To remove all resources, run the following commands.
					az group delete --name $RESOURCE_GROUP
az keyvault purge --name $KEYVAULT_NAME
Conclusion
In this post, we demonstrated how to deploy the environment and resources required to run a simple container app workload.
We used the Azure CLI and bicep templates to reliably and repeatably create Azure resources. It is worth taking this automated approach instead of doing things manually in the portal – even for small applications, as the time investment will pay off manyfold over the project’s life.
This demo is not intended to be an example of best-practice security. In a follow-up post, we will explore how we can increase the security posture of the environment with the following approaches:
- Securely accessing secrets in a .NET Core application
- Locking down the VNET even further by using Private Endpoints to access our PaaS services
Stay tuned for the next post on configuration and secrets management.
 Playtime Solutions’
AKS Best Practice Guide
A 23 page best-practice checklist, leveraging Playtime Solutions’ hands-on experience in designing, developing and delivering enterprise-grade application. This guide assists IT and DevOps professionals in creating an enterprise-grade Kubernetes environment in Microsoft AKS.

